
How to Password-Protect an Excel File: A Comprehensive Guide
How To Password-Protect An Excel File
This guide will walk you through the process of setting a password for your Excel file so that it can only be accessed by those who have the correct password. With a few simple steps, you will be able to secure your Excel file and protect your confidential data. So let's get started!
Definition Of Password Protecting Excel Files
Users can set a password to protect their Excel files with a security feature called "password-protecting Excel files." You need this password to open, change, or print the file. It is meant to keep people from getting into the Excel file without permission.
Benefits Of Password-Protecting Excel Files
1. Enhanced Security: One of the biggest benefits of password-protecting an Excel file is that it prevents unauthorized access. This can help to protect sensitive information from falling into the wrong hands.
2. Protection from Unwanted Changes: Password-protecting an Excel file also ensures that it can't be edited or modified by unintended users. This can help to prevent accidental mistakes or malicious changes from being made.
3. Improved Data Integrity: Password-protecting an Excel file can help to ensure that the data contained within it is accurate and up-to-date. As the file can only be modified by authorised users, it can be relied upon to be accurate.
4. Simplified Collaboration: Password-protecting an Excel file can also be beneficial when it comes to collaborating on a project. Limiting who can make changes to the file makes it easier to keep track of who has made changes and when.

Steps For Password Protecting Excel Files
1. Open the Excel file you'd like to protect with a password.
2. Click the "File" tab on the ribbon.
3. Choose "Info" from the menu on the left.
4. Choose "Protect Workbook" from the menu on the right side of the screen.
5. Choose how you want to protect the Excel file.
6. Type the password into the box labeled "Password," and then click "OK."
7. Type the password again in the "Re-Enter Password" box and click "OK" again.
8. Click "Save" to save the Excel file with a password.
Microsoft Office 2024 Professional Plus Key UK – 1 PC

£18.99
Microsoft Office 2024 Professional Plus Key UK – Digital Download Buy Microsoft Office 2024 Professional Plus for one compatible Windows PC, with fast email delivery...… read more
Importance Of Password-Protecting Excel Files
1. Protects Sensitive Information: Password-protecting an Excel file is the best way to ensure confidential information is kept secure. By setting a password, you are preventing any unauthorised access to the data stored in the file.
2. Control Access to File: By password-protecting an Excel file, you can control who can access the file and who cannot. This allows you to give certain people access to certain parts of the file and limit the access of others.
3. Prevents Unauthorised Changes: If you are working on a shared Excel file, password protection will ensure that the file is not altered or modified without your permission. This is especially important if the file contains sensitive data or important calculations.
4. Helps Maintain Data Integrity: Password-protecting an Excel file will help to ensure that the data stored in the file is accurate and up-to-date. By preventing unauthorised changes, you can be sure that the data is not tampered with and remains accurate.
5. Prevents Unauthorised Sharing: Password protection prevents others from sharing the file with anyone else. This helps to keep the data safe and secure and prevents it from being used without your permission.
How To Get Made Aware Of A Password From An Excel File
1. If you want to take away the password protection you put on a file before:
2. Open the "Save As" dialogue box from inside the open workbook;
3. Select General Options from the Tools drop-down menu again. 4. Delete any passwords from the "General Options" dialogue box and click OK.
4. Back in the "Save As" box, save the file with the name it already has.
Why Should Excel Have A Password?
By adding a password to your Excel spreadsheets, you can stop people who shouldn't be able to see your work from doing so. This can help you keep sensitive information, like a financial report for your business, safe while you work on it. Setting a password on an Excel spreadsheet is also a good idea if you want to share it with other people as a read-only document.
To do this, you can ask people who want to change the spreadsheet to put in a password. This lets you share information with your co-workers while making sure they can't change the information unless they know the password.
How To Protect An Excel File On Desktop With A Password
On Windows, there are two ways to protect an Excel file with a password. Before sharing a link to the file, you can add password protection using either the default Excel desktop app or OneDrive. We'll talk about both ways, but we'll start with the desktop first.
Use The App For Microsoft Excel
After you are done making changes to the Excel file, you can add password protection before saving a copy to your computer. Follow the steps below to lock an Excel file with a password.
1. Open Microsoft Excel software on Windows.
2. Open the file you want to protect with a password.
3. Make any changes you need to, and then click File at the top.
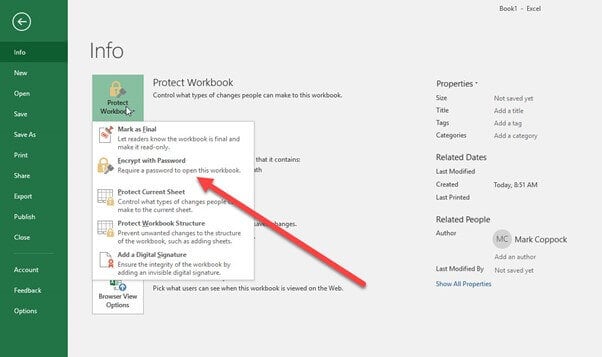
4. Select Info from the sidebar.
5. Click on Protect Workbook.
6. Select Encrypt with Password.
Use OneDrive Internet To Protect An Excel File With A Password
If you are already paying for one of the Microsoft plans because you use Excel on Windows 10 or Windows 11, chances are you are already paying for one of the plans.
All paid plans for Microsoft 365 come with 1TB of storage for OneDrive and other perks. One of these is the ability to protect a OneDrive link that can be shared by adding a password. So, instead of sending the file via email, you could put it in your OneDrive account and share a password-protected link to the file.
Using that, you can even set a date after which the file won't be accessible anymore. Also, all Microsoft Office apps work well with the cloud storage service OneDrive. It is how every Excel file is saved by default. Follow the steps below to lock an Excel file with a password on OneDrive.
Even though Google Sheets, Apple Numbers, and newcomers like Airtable and Coda are all in the spreadsheet market, Microsoft Excel is still the best, especially for businesses and enterprises.
Protect The Password To Your Excel File
When you change the password for an Excel file, it's important to keep it safe in case you forget it. If you lose your password for a password-protected Excel file, it can be hard to get it back. If this happens, you may lose your whole file. If someone else needs to look at or change your Excel files in the future, you must learn how to password-protect them and keep them safe.
Make it a point to change the passwords for your Excel files every month or two to keep them safe. This update is important for files you use often that feed data into graphs, linked spreadsheets, and other documents you'll need to use often. If you rarely use a file, you may not need to change the password unless you are worried that someone could open it without permission.
If you work for a small business or company where employees often open Excel files, you may want to change the encryption after an employee leaves or when there is a change in staff. This will make sure that your files are always safe and that former employees can't get to documents they shouldn't be able to see.
Conclusion
By following the steps this guide tells you to do, you should now have a safe, password-protected Excel file that no one else can get into. Now you can be sure that your important information is safe and sound.
For further blog posts see Ecokeys articles - Blog